Wednesday, August 28, 2013
Haven: A Stranger Magic Book Review
I read the book Haven: A Stranger Magic. It is a fast paced book with lots of surprises. Haven is a place where Witches, Vampires, Orcs, Goblins and Elves live in peace. All of that is a about to come to an end though. The mystery and suspense will keep you wanting more. This is one of those books that you can't put down.
I received one or more of the products mentioned above for free using Tomoson.com. Regardless, I only recommend products or services I use personally and believe will be good for my readers.
Saturday, August 24, 2013
Homemade Playdough
While surfing Pinterest, like I usually do, I found what looked like a great playdough recipe using Kool-Aid. I followed the recipe and directions to a tee and to my dismay (and my daughters) it wasn't anything like the pictured showed. With that being said, it is still a great playdough recipe. Below is the results and recipe. You can choose to add the Kool-Aid if you want but it really didn't do anything for the color.
1cup flour
1cup water
1/2cup salt
2tbsp cream of tartar
1tbsp vegetable oil
1 pk of Kool-Aid (optional)
food coloring

This recipe is super simple. Add all the ingredients into a medium sized pot. If you want to add in the Kool-Aid, go ahead. The only thing you shouldn't add to the pot is the food coloring. Gently stir the ingredients until they have come together looking like a thin paste.


I decided to add food coloring to mine to give it more color.

1cup flour
1cup water
1/2cup salt
2tbsp cream of tartar
1tbsp vegetable oil
1 pk of Kool-Aid (optional)
food coloring

This recipe is super simple. Add all the ingredients into a medium sized pot. If you want to add in the Kool-Aid, go ahead. The only thing you shouldn't add to the pot is the food coloring. Gently stir the ingredients until they have come together looking like a thin paste.

Turn it on medium heat and stir it until it forms a ball. It takes only a few minutes for it to turn into a ball.

If you added the Kool-Aid, this is what the playdough will look like when it cools.

I decided to add food coloring to mine to give it more color.

All in all it is a really good playdough recipe to use. It doesn't come out sticky or anything. I just suggest you use food coloring instead of Kool-Aid.
Friday, August 23, 2013
DIY Febreeze
Almost everyone loves the smell of Febreeze but it can be pretty expensive. Depending on the fabric softener, you can make your own Febreeze for as little as $.06 per bottle.
1/4 cup of fabric softener
2Tbsp baking soda
27oz hot tap water


1/4 cup of fabric softener
2Tbsp baking soda
27oz hot tap water

This is so simple I couldn't believe it. Add the baking soda and fabric softener. If you are using the homemade fabric softener, the baking soda will fizz a little bit because of the vinegar. Then add 27oz of water. Make sure the baking soda has dissolved by gently turning up bottle up and down a few times.

If you use the homemade fabric softener, you can make the Febreeze for about $.06 a bottle. If you buy your fabric softener it can be about $.15 per bottle. A big perk about making your own Febreeze is you can create any smell you want.
Friday, August 16, 2013
DIY Natural Laundry Detergent
I have seen a lot of people posting about making their own laundry detergent. I started looking into it more and asking if any of my friends made their own. A few of them did and said it was great. They didn't have to spend a lot of money on brand detergent, didn't have harsh chemicals or dyes, and pretty easy. So I decided to see what it was about and make some.
Supplies:
1 bar Fels Naptha bar
1 cup Borax
1 cup washing soap
5gallon bucket & funnel


Add 4 cups of water. Turn it on low heat. Let the soap melt, stirring slowly and constantly. You don't want it to boil.

Fill your 5 gallon bucket up half full of water before you pour the soap mixture into the bucket. Add the soap mixture once it has melted in the water. Add your 1 cup of Borax and 1 cup of washing soda.

Stir the mixture so the so the Borax and washing soda dissolve.

Fill the rest of the bucket, almost to the top, with water. I added about 6-8 cups more water. Put the lid on and let it sit over night.


After mixing it again, use a funnel to help put your soap in an easy to use container. I used an old detergent bottle since it had a spout on it. Only fill the bottle half full. Fill the rest of the bottle with water.

 With this recipe you make 5gallons of concentrate. Once you add the water when you put it in the bottle its like you have 10gallons (1280 oz) of soap. Since you only use a 1/2cup (4oz) of soap, its like having enough laundry soap for 320 loads.
Cost break down:
1cup washing soda - $.54
1cup Borax - $.40
1bar of Fels Naptha - $.97
Total - $1.91
Cost per load - $.005 LESS THAN A PENNY!
If you were to buy enough laundry detergent to have 320 loads, it would cost you close to $20 (each bottle having 150 loads) for only 300 loads. You save roughly $18 in making your own laundry soap. Your savings would depend on the type of brand laundry detergent you typically buy.
Supplies:
1 bar Fels Naptha bar
1 cup Borax
1 cup washing soap
5gallon bucket & funnel

First thing you need to do is grade the Fels Naptha bar. It takes a little bit of time. If you have a food processer it would be easier. It looks like cheese once its all graded. Put the soap in a large pot.

Add 4 cups of water. Turn it on low heat. Let the soap melt, stirring slowly and constantly. You don't want it to boil.

Fill your 5 gallon bucket up half full of water before you pour the soap mixture into the bucket. Add the soap mixture once it has melted in the water. Add your 1 cup of Borax and 1 cup of washing soda.

Stir the mixture so the so the Borax and washing soda dissolve.

Fill the rest of the bucket, almost to the top, with water. I added about 6-8 cups more water. Put the lid on and let it sit over night.

When you open it the next morning this is what it will look like. Some may look more like gel. Some may be more watery. It just depends on the humidity on where you store it. If yours is a thick gel, add a little bit of water (this is one reason why you don't fill your bucket to the top). I didn't add any extra water. Stir mixture again so everything mixes well.

After mixing it again, use a funnel to help put your soap in an easy to use container. I used an old detergent bottle since it had a spout on it. Only fill the bottle half full. Fill the rest of the bottle with water.

Now your soap is already to use. Remember before each time you use it, you need to shake the bottle to make sure the mixture is mix. You only use 1/2cup of soap per load.

Cost break down:
1cup washing soda - $.54
1cup Borax - $.40
1bar of Fels Naptha - $.97
Total - $1.91
Cost per load - $.005 LESS THAN A PENNY!
If you were to buy enough laundry detergent to have 320 loads, it would cost you close to $20 (each bottle having 150 loads) for only 300 loads. You save roughly $18 in making your own laundry soap. Your savings would depend on the type of brand laundry detergent you typically buy.
Thursday, August 15, 2013
Homemade Fabric Softener
I have been looking for ways to cut back on costs and lessen the chemicals that my family comes in contact with. While looking through Pinterest, I found a lot of people trying out homemade fabric softener. After researching it a little, it looked pretty easy and had very few ingredients.
Supplies:
3 cups vinegar
2 cups of conditioner
6 cups water
large enough container for all ingredients
measuring cup


Supplies:
3 cups vinegar
2 cups of conditioner
6 cups water
large enough container for all ingredients
measuring cup

Measure out 2 cups of conditioner. Depending on the size bottle you buy, it can be the whole bottle. Add in 6 cups of warm water. Gently stir the mixture until the conditioner has dissolved in the water. Try not to shake because it will cause it to foam (I learned this the hard way)

Add 3 cups of vinegar and stir gently. Voilà its done, homemade fabric softener. You only need a 1/4 cup per load. I put it in a liquid fabric softener ball so I didn't have to babysit the washer to put it in at the right time.

Breakdown of cost:
3cups vinegar - $1.08
1 bottle of conditioner - $.88
Total - $1.96
This batch makes 112oz which is about 56 loads. It costs about $.04 per load. A bottle of name brand fabric softener that has a 60 load use is about $3.97. Making it yourself saves about $2.01. The best part about making your own (besides the saving) is you can use your favorite smelling conditioner.
Sunday, August 11, 2013
Refilling the "un"refillables
We love using the Lysol No Touch Soap Dispenser. When it came time to get a refill bottle we went to our local Wal-Mart (because we all know its the cheapest) to look for the refills. Needless to say you can't buy just 1 bottle, you have to buy a double pack for $7.50 and there was no way I was going to spend that much. We were also looking for a new Wet Jet refill ($5.22) too. I went looking through youtube at the different videos showing the different ways to refill these types of bottles. Below is the easiest way I found to refill these "un"refillable bottles.
Lysol No Touch Soap Dispenser

Use whatever type of liquid hand soap you want.
Heat up a cup of water in the microwave for about 1min 30sec. The water needs to be very hot. Hold the dispensing end in the water for at least 30 sec.


The cap should twist off. **Remember** it has been in very hot water, so the plastic will be hot. Use a rag or something to protect your hands


Screw the cap back on tight.

Lysol No Touch Soap Dispenser

Use whatever type of liquid hand soap you want.
Heat up a cup of water in the microwave for about 1min 30sec. The water needs to be very hot. Hold the dispensing end in the water for at least 30 sec.

After it has sat in the hot water for a little bit, twist the top a little bit and pull. The top should pop off. **Remember** it is in really hot water so the plastic will be hot. I used a rag to help pull it off.

Using whatever liquid hand soap you want, fill the bottle almost full. Place the top back on the bottle. Twist slightly and press gently. It should snap back on. Make sure it is on tight.

Now your bottle is ready to use again.

Wet Jet Bottle Refill
Heat up the cup of water for about 1min 30sec. The water needs to be very hot. Hold the bottle in the hot water for about 30sec.

The cap should twist off. **Remember** it has been in very hot water, so the plastic will be hot. Use a rag or something to protect your hands

Use 1/4 cup of your favorite floor cleaner. Before you pour in the cleaner, fill the bottle with water. Do not fill it all the way up. Fill it to just above the top of the label, then add your cleaner. This should cut down on the amount of bubbles you get in the bottle.


Its ready to use again.
If you were to buy both the refills for the hand soap and the wet jet it would cost roughly $12.72 plus tax.
If you were to refill the bottles at your house, the hand soap would cost about $.82 and the wet jet would cost about $.14. These prices do depend on the cost of the product you use to refill them with. However you can see that it will significantly cut your costs.
Friday, August 9, 2013
Reusable Sandwich Bag
Since school is starting up shortly I was trying to figure out a way to cut some costs. I realized I buy a lot of sandwich bags for her sandwiches and snacks. I have a ton of scraps too that I can make them with.
Supplies:
1 piece of fabric 7in by 20in
1 piece of fabric 7in by 14 in
1in piece of Velcro
thread
scissors
sewing machine
First you need to cut your pieces of fabric. One piece needs to be 7in by 20in and the other piece 7in by 14in. They can be same fabric or different. Fold them in half and iron them

With the larger piece put right sides together and sew the 2 sides together. Leave the bottom open. Turn it right side out. Making sure that the closed ends are at the top, place the smaller piece on the larger piece. Make sure the bottoms line up with each other. Pin together.

Sew the 3 sides together. Clip the corners so it is not too bulky. Turn right side out. Place Velcro where you want it to close. I placed mine in the middle. Make sure you line it up so the Velcro keeps it closed. Sew the Velcro on

All done and ready to use!

Friday, August 2, 2013
Rock Trivet

Supplies:
1 piece of felt (any color)
small rocks
hot glue gun and sticks
scissors
Optional:
I used a dessert plate to trace the size I wanted.

Create the size trivet you want. You can trace a plate ( I did that) or free hand it. Cut it out. Find the center of your trivet and start hot gluing the rocks there. I found that you need to start with larger rocks in the middle because as you work out towards the edge you will need smaller ones.
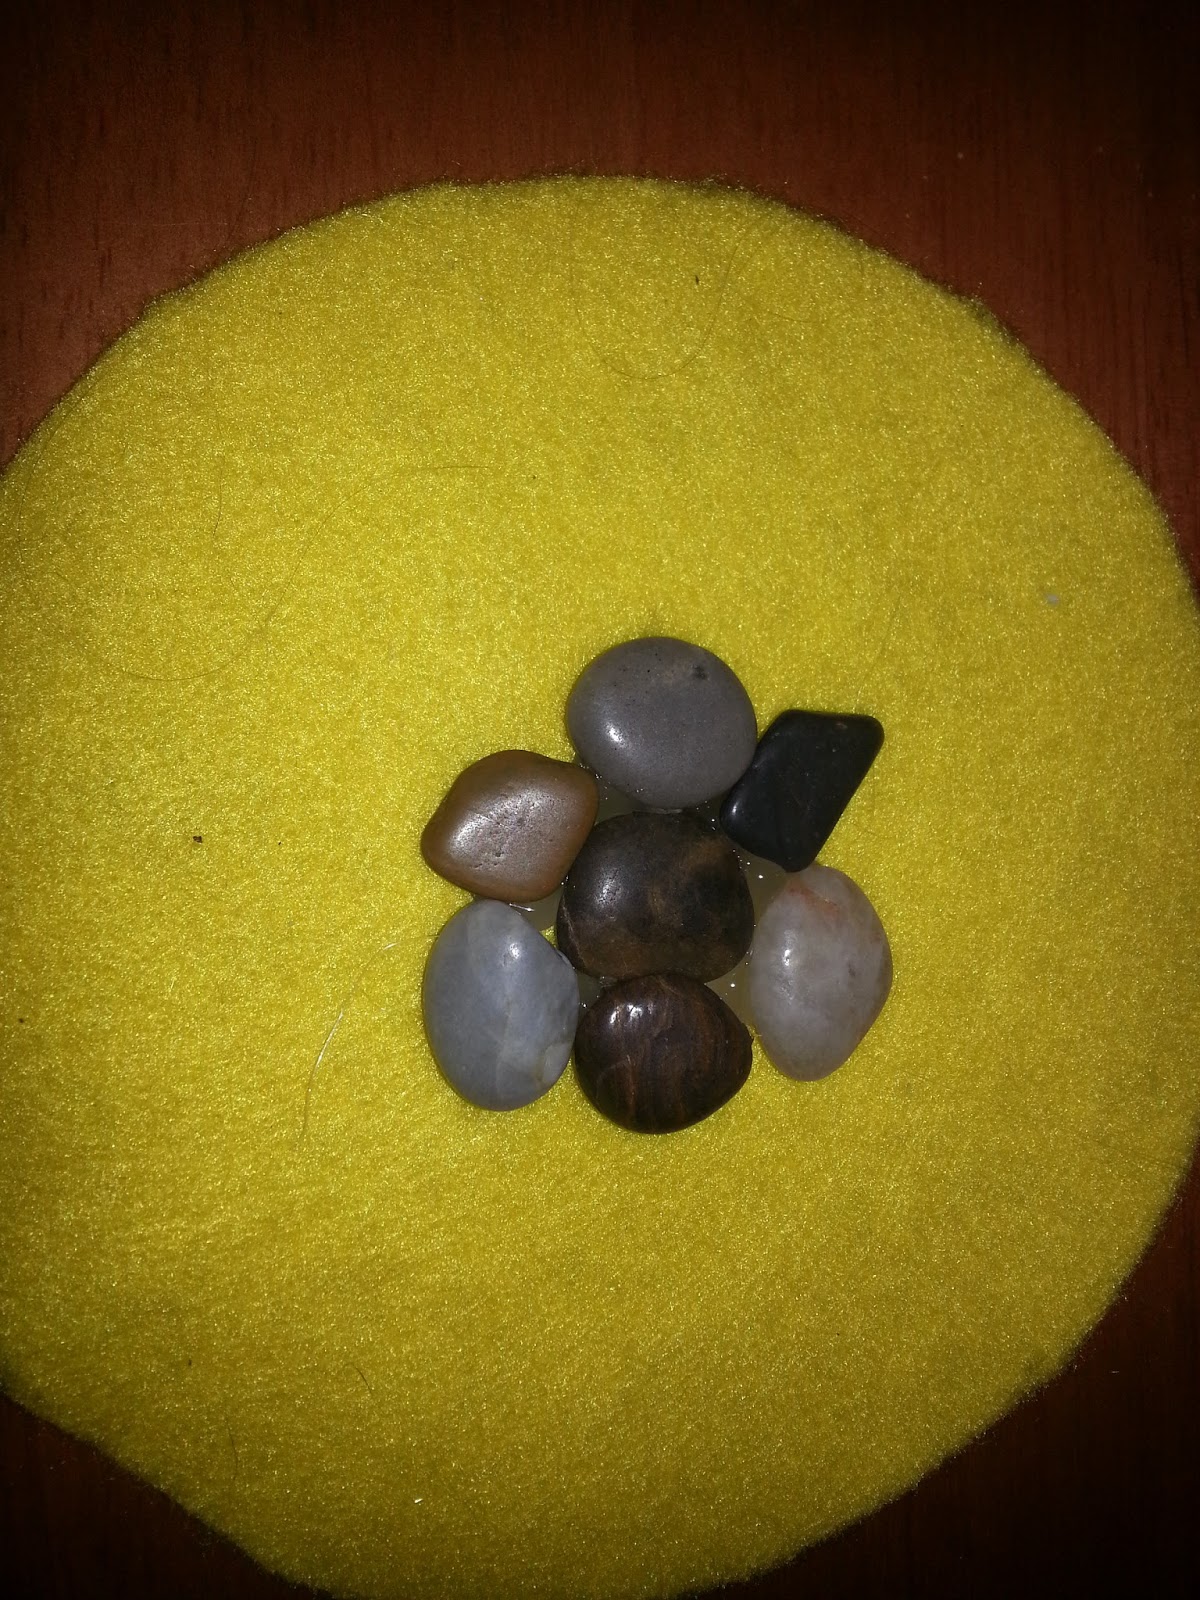
I thought it would have been flimsy but with all the hot glue it actually is pretty stiff.

Thursday, August 1, 2013
Wizards Wand
My daughter found a black and yellow robe with a hood the other day and it gave me the idea that she could be a girl wizard for Halloween (yes I know its months from now but like any kid she can't decided until the last minute). So I went looking on my trust craft site, Pinterest, to see if I could find something to make a wand. Below is how I made the wand that I found.
Supplies:
1 chopstick
glue gun and sticks
rocks, marbles, pony beads, etc.
paint
paintbrush
water


After the hot glue has dried, you can start painting it. I didn't have brown so I just mixed colors until I got a color I liked. I will admit I was a little unsure about painting over cooled hot glue but it worked well.


Supplies:
1 chopstick
glue gun and sticks
rocks, marbles, pony beads, etc.
paint
paintbrush
water

The first thing was to attach a rock, marble, pony bead, or whatever you want at the big end of the chopstick. Make sure you use enough hot glue to keep it there.

Start adding hot glue all down the chopstick adding any item you wish. You can't go wrong with the hot glue.After the hot glue has dried, you can start painting it. I didn't have brown so I just mixed colors until I got a color I liked. I will admit I was a little unsure about painting over cooled hot glue but it worked well.

Let it dry and you are all set to go. All in all it was pretty easy to make and everything was already at my house.

Subscribe to:
Posts (Atom)